이젠 이클립스를 사용하시는 분 보다 안드로이드 스튜디오를 사용하는 분들이 훨씬 많아졌을 겁니다. 이전 버전에 비해 최신 버전은 비교할 수 없을 정도로 안정화가 진행되었기도 하고, 구글에서도 대놓고 안드로이드 스튜디오 사용을 권장하고 있죠. (이젠 안드로이드 스튜디오에서만 지원하고, 이클립스 ADT에서 지원하지 않는 기능들이 꽤 됩니다)
하지만, 이클립스 환경에 익숙해져 있다 안드로이드 스튜디오로 넘어오게 되면 처음엔 적응하기가 어렵습니다. (안 그런 분들도 계시겠지만, 전 꽤 시간이 걸린 것 같아요... 대략.. 3주 정도?!) (그 이후에도 틈만 나면 단축키 몰라서 구글링 한 건 비밀)
이젠 저도 안드로이드 스튜디오를 사용한지 1년이 되어가는데요, 그 동안 안드로이드 스튜디오를 사용하여 개발을 진행하면서 자주, 그리고 유용하게 사용하는 단축키들을 정리해 보려 합니다.
코딩 실력도 중요하지만, 그에 못지 않게 중요한 것이 바로 IDE 실력(...)이지 않겠어요? 지금부터 안드로이드 스튜디오 고수 되기 속성 강좌, 단축키 파트를 시작합니다!
본 포스트는 Android Studio 1.2 정식 버전을 기준으로 작성되었습니다. 추후 업데이트로 인해 작성된 내용과 달라지는 부분이 있을 수 있습니다.
사용하지 않는 Import 정리 (Optimize Imports)
코드 중에 사용되지 않는 import 항목을 삭제합니다. 실행 후 정리된 import 문 수가 표시됩니다.
사용 전
사용 후
XML 파일에서 사용하지 않는 namespace도 동일한 단축키로 정리할 수 있습니다.
XML 파일에서 동일한 명령을 사용한 모습
Mac: Ctrl + Option + O
Windows: Ctrl + Alt + O
자동 완성/수정 (Show intention actions and quick-fixes)
구현되지 않은 부분이 있어 오류가 발생하는 경우, 오류를 수정하기 위해 필요한 작업들을 추천해 주거나, 가능한 경우 바로 해당 작업을 실행합니다. import 선언이 되지 않는 클래스의 import 선언을 추가할 때, 인터페이스를 구현할 때 등 다양한 경우에 매우 자주 사용합니다. 이클립스에는 이와 비슷한 기능으로 'Organize imports' 가 있었죠.
import 선언이 추가되지 않은 경우
인터페이스를 구현하지 않은 경우
이 기능을 사용하려면, 오류가 있는 부분 위에 커서를 올려둔 후 약 1초 정도 기다려야 합니다. 문제가 있는 부분은 첫 번째와 같이 밑줄로 강조되는데요, 강조되기 전에는 단축키를 누르더라도 해당 기능이 동작하지 않으므로 사용시 유의해야 합니다.
Mac / WIndows: Alt + Enter
이름 바꾸기 (Rename)
선택한 항목의 이름과, 해당 항목을 참조하는 다른 항목에서의 이름까지 변경합니다. 클래스 이름이나 리소스 이름을 변경할 때 꼭 필요한 기능입니다.
이름을 변경할 항목에 커서를 올려둔 후, 단축키를 누르면 이름 변경 모드로 진입하며, 변경 후 엔터 키를 누르면 변경한 내용이 반영됩니다.
클래스 이름 수정
리소스 이름 수정
Mac / Windows: Shift + F6
코드 정렬 (Reformat code)
코드를 특정 기준에 맞도록 정렬합니다. (인덴트, 한 줄당 최대 글자 수 등) 열심히 개발 후 커밋하기 전에 코드를 정리할 때 사용하면 유용합니다.
별도로 지정하지 않을 경우 Preferences > Editor > Code Style > Scheme 에 지정된 항목의 설정이 적용됩니다.
Code Style 설정 화면
정렬 실행 이전 모습 (인덴트 틀어짐 및 한 줄에 두 명령이 혼재되어 있음)
정렬 후
Mac: Alt + Command +L
Windows: Ctrl + Alt + L
메소드 오버라이드 (Override method)
상위 클래스 내에 있는 오버라이드 가능한 메소드의 목록을 보여주고, 선택한 항목을 자동으로 코드에 추가합니다.
액티비티/프래그먼트의 생명주기 메서드를 작성할 때 유용합니다. (onCreate(), onResume() 등)
액티비티 코드 내에서 명령을 실행한 모습
Mac / Windows: Ctrl + O
인터페이스 구현 (Implement methods)
메서드 오버라이드와 유사하며, 인터페이스에서 구현해야 하는 메서드를 추가할 수 있는 다이얼로그를 표시하고, 선택한 항목을 자동으로 코드에 추가합니다.
뷰의 OnClickListener 등을 구현할 때 주로 사용합니다.
View.OnClickListener 인터페이스를 구현하지 않은 상태에서 명령을 실행한 모습
Mac / Windows: Ctrl + I
문서 보기 (Quick Documentation Lookup)
커서가 위치한 심볼의 문서(Javadoc 등)을 표시합니다. 클래스나 메서드의 설명을 확인하고 싶을 때 유용합니다.
onCreate() 메서드의 Javadoc을 조회하는 모습
Mac / Windows: F1
매개변수 정보 (Parameter info)
커서가 위치한 메서드의 매개변수 목록을 조회합니다. 메서드가 받을 수 모든 매개변수의 조합을 확인할 때 유용합니다.
setContentView() 메서드에서 받을 수 있는 모든 매개변수 조합을 표시한 모습
Mac: Command + P
Windows: Ctrl + P
선언부로 이동 (Go to declaration)
커서가 위치한 부분에 해당하는 심볼의 선언부로 이동합니다. 코드 흐름을 파악하기 위해 메서드의 구현 확인할 때 유용합니다.
setContentView() 메서드의 구현 내용을 확인하려면 메서드 위에 커서를 놓은 후 명령을 실행합니다.
setContentView() 의 선언부
Mac: Command + B
Windows: Ctrl + B
통합 검색 (Search everywhere)
모든 종류의 리소스(소스, 리소스, 심볼 등)에서 입력한 키워드와 일치하는 항목을 검색합니다. 이름은 기억 나는데 어디에 있는지 기억이 잘 나지 않을 때, 특정 상수가 어느 곳에 선언되어 있는지 찾을 때 유용합니다.
Search Everywhere 창을 띄운 모습
검색을 실행한 모습
Mac / Windows: Shift * 2 (Shft키 두 번 누름)
저는 개발을 하면서 위에서 정리한 단축키만 사용하는데요, (심지어 실행도 그냥 마우스 클릭으로 하는 편입니다) 이 외에 다른 유용한 단축키가 있다면 알려주세요! 별도로 정리해서 본문에 추가하도록 하겠습니다. :)
This guide shows you how to control access to a Linux instance by creating SSH key pairs and editing public SSH key metadata. If you simply need to connect to a Linux instance, see Connecting to Linux Instances. If you need to connect to a Windows instance, see Connecting to Windows Instances.
A public SSH key file that is applied to instance-level metadata or project-wide metadata.
A private SSH key file that the user stores on their local devices
Users can connect to an instance through third-party tools if their public SSH key is available to the instance through the metadata server and if they have the matching private SSH key. Any user who connects to an instance is automatically an administrator of the instance with permissions to run commands with sudo. SSH access to instances as the root user is disabled even if you specify an SSH key in project or instance metadata for root.
Before you begin
If you want to use the command-line examples in this guide:
If you create and manage SSH key pairs yourself through the Cloud Platform Console, the gcloud command-line tool, or the API, you must keep track of the used keys and delete the public SSH keys for users who should not have access. For example, if a team member leaves your project, remove their public SSH keys from metadata so they cannot continue to access your instances.
Additionally, specifying your gcloud tool or API calls incorrectly can potentially wipe out all of the public SSH keys in your project or on your instances, which disrupts connections for your project members.
By creating and managing SSH key pairs, you can allow users to access a Linux instance through third-party tools.
An SSH key pair consists of two files: a unique private SSH key file that is stored locally by a user and a matching public SSH key file that is accessed by the instances that the user connects to.
If a user presents their private SSH key, they can use a third-party tool to connect to any instance that has access to the matching public SSH key file from metadata even if they are not a member of your GCP project. Therefore, you can control which instances a user can access by changing the public SSH key metadata on one or more instances.
If you need to add users who have existing SSH key pairs, locate the public SSH key for each existing key pair.
Format any public SSH keys that you want to add so they will work correctly with the tool that you will use to edit metadata. Optionally, you can also format your public SSH keys to add, edit, or remove expiration times.
Connect to your Linux instance through a third-party tool to ensure that each public SSH key is added or removed correctly. A user can only connect to an instance if their public SSH key is available to the instance through the metadata server and if they have the matching private SSH key.
Creating a new SSH key pair
If you do not have an existing private SSH key file and a matching public SSH key file that you can use, generate a new SSH key pair. If you want to use an existing SSH key pair, locate the public SSH key file.
Linux and macOS
Windows
On Linux or macOS workstations, you can generate a key pair with the ssh-keygen tool.
Open a terminal on your workstation and use the ssh-keygen command to generate a new key pair. Specify the -C flag to add a comment with your username.
[KEY_FILENAME] is the name that you want to use for your SSH key files. For example, a filename of my-ssh-key generates a private key file named my-ssh-key and a public key file named my-ssh-key.pub.
[USERNAME] is the user for whom you will apply this SSH key pair.
This command generates a private SSH key file and a matching public SSH key with the following structure:
ssh-rsa [KEY_VALUE][USERNAME]
where:
[KEY_VALUE] is the key value that you generated.
[USERNAME] is the user that this key applies to.
Restrict access to your private key so that only you can read it and nobody can write to it.
chmod 400~/.ssh/[KEY_FILENAME]
where [KEY_FILENAME] is the name that you used for your SSH key files.
Repeat this process for every user that you need to create a key pair for. Then, locate the SSH key pairs that you made as well as any existing SSH keys that you want to add to a project or instance.
Locating an SSH key pair
There are multiple reasons why you might need to locate an SSH key pair. For example, if you want to add a user's public SSH key to a project or instance, you will need access to the public key file for their key pair. Alternatively, you might need to locate your private SSH key file in order to connect to a Linux instance.
When an SSH key pair is created, it is saved to a default location. The default locations and names of your public and private SSH key files depend on the tools that were used to create that key pair.
Linux and macOS
Windows
gcloud
If you created a key pair on a Linux or macOS workstation by using the ssh-keygen tool, your key pair was saved to the following locations:
Public key: ~/.ssh/[KEY_FILENAME].pub
Private key: ~/.ssh/[KEY_FILENAME]
where [KEY_FILENAME] is the filename of the SSH key pair, which was set when the key pair was created.
Before you can upload your public SSH keys to your project or instance metadata, you must check the format of each public SSH key file that you plan to add.
Depending on which tool you will use to edit metadata, format your keys to work with the Cloud Platform Console, the gcloud command-line tool, or API methods. Optionally, you can also change your public SSH keys to add, edit, or remove an expiration time.
[USERNAME] is the user for this SSH key, which was specified when the key pair was created.
[EXPIRE_TIME] is a value in RFC3339 format. For example: 2018-12-04T20:12:00+0000.
Otherwise, the public SSH key must have the following format:
ssh-rsa [KEY_VALUE][USERNAME]
where:
[KEY_VALUE] is the public SSH key value.
[USERNAME] is the user for this SSH key, which was specified when the key pair was created.
If your key does not match one of the above formats or if you want to add, edit, or remove an expiration time, then follow the instructions below to format your public SSH key. Otherwise, leave the file open and add the public SSH key to project or instance metadata.
To format a public SSH key for the console:
Make a copy of your public key file. Use the copy with Compute Engine and keep the original file to use with your other SSH configurations.
Open the copy of your public key file.
Modify the public key file so that it has the following format:
ssh-rsa [KEY_VALUE][USERNAME]
where:
[KEY_VALUE] is the public SSH key value.
[USERNAME] is the user for this SSH key, which was specified when the key pair was created.
Alternatively, if you want the public SSH key to have an expiration time, then modify the file to match the following format:
User access to a Linux instance through third-party tools is determined by which public SSH keys are available to the instance. You can control the public SSH keys that are available to a Linux instance by editing metadata, which is where your public SSH keys and related information are stored. There are three types of metadata for your public SSH keys:
Project-wide public SSH keys: Use this metadata to give users general access: the ability to connect to most instances in your project.
Allow or Block project-wide public SSH keys: Use this metadata value to block or allow project-wide public SSH keys on a specific instance. By default, an instance accepts all project-wide public SSH keys. Block project-wide public SSH keys if you want to restrict the instance to only users with instance-level public SSH keys.
Instance-level public SSH keys: Use this metadata to give users special access: the ability to connect to a specific instance in your project, even if it blocks project-wide public SSH keys.
Adding or removing project-wide public SSH keys
Use project-wide public SSH keys to give users general access to a Linux instance. Project-wide public SSH keys give users access to all of the Linux instances in a project that allow project-wide public SSH keys. If an instance blocks project-wide public SSH keys, a user cannot use their project-wide public SSH key to connect to the instance unless the same public SSH key is also added to instance metadata.
To add a public SSH key, click Add item at the bottom of the page. This will produce a text box. Copy the contents of your public SSH key file and paste them in to the text box. Repeat this process for each public SSH key that you want to add.
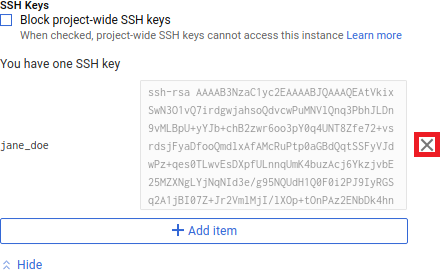
To remove a public SSH key, click the removal button next to it:
Repeat this process for each public SSH key that you want to remove.
When you are done, click Save at the bottom of the page.
When you have finished, test your changes by trying to connect to your Linux instance through third-party tools.
If you encounter issues, check the metadata of the instance that you are trying to connect to. If instance-level metadata is set to block project-wide SSH keys or has a deprecated instance-only sshKeys value, the instance will ignore all project-wide SSH keys. To apply project-wide keys to an instance, make sure the instance allows project-wide public SSH keys and, if present, remove the deprecated instance-only sshKeys value from instance metadata.
Allowing or blocking project-wide public SSH keys from a Linux instance
If you need your instance to ignore project-wide public SSH keys and use only the instance-level keys, you can block project-wide public SSH keys from the instance. This will only allow users whose public SSH key is stored in instance-level metadata to access the instance. If you want your instance to use both project-wide and instance-level public SSH keys, set the instance metadata to allow project-wide SSH keys. This will allow any user whose public SSH key is stored in project-wide or instance-level metadata to access the instance.
Click on the name of the instance that you want to modify.
Click Edit in the toolbar.
Under SSH Keys, go to the Block project-wide SSH keys checkbox.
To block users with project-wide SSH keys from connecting to this instance, select Block project-wide SSH keys.
To allow users with project-wide SSH keys to connect to this instance, deselect Block project-wide SSH keys.
When you are done, click Save at the bottom of the page.
When you have finished, test your changes by trying to connect to your Linux instance through third-party tools.
Adding or removing instance-level public SSH keys
Instance-level public SSH keys give users access to a specific Linux instance. Users with instance-level public SSH keys can access a Linux instance even if it blocks project-wide public SSH keys.
Click on the name of the instance that you want to modify.
Click Edit in the toolbar.
Under SSH Keys, click Show and edit. The section expands to show all of the instance-level public SSH keys.
Modify the instance-level public SSH keys:
To add a public SSH key, click Add item. This will produce a text box. Copy the contents of your public SSH key file and paste them in to the text box. Repeat this process for each public SSH key that you want to add.
To remove a public SSH key, click the removal button next to it:
Repeat this process for each public SSH key that you want to remove.
When you are done, click Save at the bottom of the page.
When you have finished, test your changes by trying to connect to your Linux instance through third-party tools.